TM 5-3805-292-23
0173
MILITARY CONNECTOR REPAIR
000173
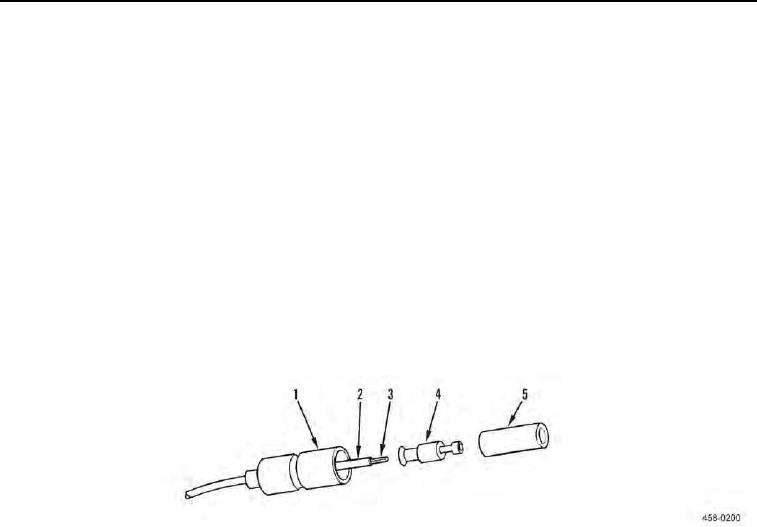
1. Slide shell (Figure 3, Item 1) back on wire (Figure 3, Item 2) to expose sleeve (Figure 3, Item 5).
2. Remove sleeve (Figure 3, Item 5) from terminal (Figure 3, Item 4) by pulling sleeve forward.
3. If defective, remove terminal (Figure 3, Item 4) from wire (Figure 3, Item 2) by cutting through wire just behind
terminal.
N OT E
Perform steps 4 through 6 only if terminal was removed.
4. Using wire stripping tool, strip insulation from wire (Figure 3, Item 2) to expose length of metal strands
(Figure 3, Item 3) equal to depth of terminal (Figure 3, Item 4).
5. Using crimping tool, securely crimp terminal (Figure 3, Item 4) to metal strands (Figure 3, Item 3) of wire
(Figure 3, Item 2).
6. Install sleeve (Figure 3, Item 5) on terminal (Figure 3, Item 4) by pushing sleeve over front of terminal until fully
seated.
7. Slide shell (Figure 3, Item 1) up wire (Figure 3, Item 2) and over sleeve (Figure 3, Item 5).
Figure 3. Military Connector Repair.
0173
END OF TASK
ELECTRICAL GROUND POINTS
000173
N OT E
Good electrical ground points are essential for the proper functioning of the electrical
system. Ground points on electrical components and machine frame must be maintained
in a clean and secure condition to minimize electrical problems.
1. Remove nut, locknut, lockwasher, screw, etc. connecting ground wire or ground cable to ground point on
electrical component or threaded stud on machine frame.
2. If necessary, clean dirt from ring terminal, surface of electrical component, ground point, and all mounting
hardware with detergent, water, and a scrub brush.
3. Remove any corrosion or rust with a wire brush and abrasive cloth.
4. Replace defective mounting hardware. Replace defective ring terminal IAW Ring Terminal Repair in this work
package.
5. Install ground wire or ground cable on ground point with mounting hardware and tighten securely.
END OF TASK

