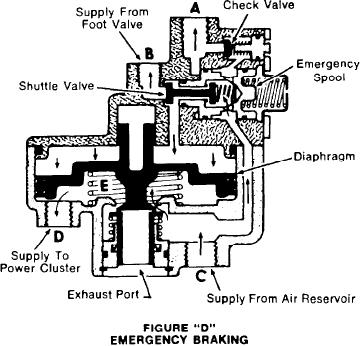
emergency tank to enter the top side of the dia-
APPLYING THE BRAKES
phragm. The diaphragm is pushed down allowing
(Figure "C") When the foot valve is pushed, air
e m e r g e n c y tank pressure to flow past the dia-
enters at port "B" and forces the diaphragm down,
phragm seat at "E" and out port "D" to the power
aiganst spring tension. As the diaphragm moves
cluster. The valve will remain in this position until
down, the diapraghm seat at "E" is opened and air
air pressure builds high enough to force the check
pressure from the air tanks flows thru port "D" to
valve from its seat, charge the emergency tank, and
the power cluster applying the brakes. When the
force the emergency spool back to the right against
foot pedal is released, air is exhausted thru port
spring tension.
"B" to the foot valve and through the exhaust port
of the valve body.
TROUBLESHOOTING THE ERQ VALVE
Examine the system frequently for air leaks and
make certain the air pressure is a minimum of 80
PSI. The maximum braking force available at the
w h e e l s is proportional to the air pressure in the
system. A system pressure of 80 PSI will not give as
effective braking as a system pressure of 100 PSI.
CHECKING THE "AUTOMATIC APPLY
OPERATION"
1. Run the engine until maximum air reservoir pres-
sure is reached, then stop the engine.
2. Open the drain cock in the main air tank until all
the air is drained from tank.
3 . The brakes should automatically apply-check
to see that they have.
AUTOMATIC APPLICATION OF BRAKES
4. Open the drain cocks in the emergency tanks
(Figure "D") In an emergency situation if either
and see that both tanks have pressure in them.
port "B" or port "A" is exhausted because of a rup-
tured line, there is a pressure drop on the left side
If the brakes do not
apply and the emergency
of the emergency spool. (Compare the position of
t a n k s have pressure in
them, examine the ERQ
the emergency spool in figure "C" and figure "D".)
valves for dirt, water and
air leaks. The ERQ valves
Immediately the emergency spool moves to the left
can be disassembled and
cleaned. A kit is available
u n d e r spring tension. The check valve seats, pre-
to overhaul them.
v e n t i n g emergency tank pressure from escaping
thru port "A". The shuttle valve seats the emergency
If the brakes do not apply and the emergency
s p o o l preventing air pressure from escaping thru
tanks have no pressure in them, examine the system
port "B"' and the foot valve. As the shuttle valve
for air leaks, especially the check valves.
shifts to the left, it allows air pressure from the
[7]

