TM 5-3805-255-14
0064
DISASSEMBLY CONTINUED
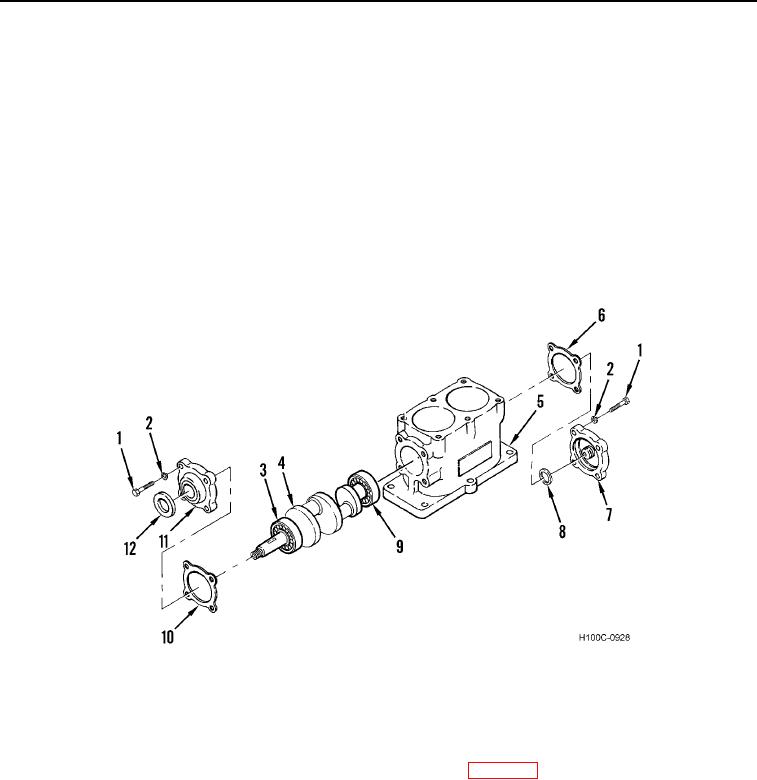
30. Remove four bolts (Figure 7, Item 1), lockwashers (Figure 7, Item 2), and front cover (Figure 7, Item 11) from
crankcase (Figure 7, Item 5). Discard lockwashers.
31. Remove gasket (Figure 7, Item 10) and oil seal ring (Figure 7, Item 12) from front cover (Figure 7, Item 11).
Discard seal ring and gasket.
32. Remove four bolts (Figure 7, Item 1), lockwashers (Figure 7, Item 2), and rear cover (Figure 7, Item 7) from
crankcase (Figure 7, Item 5). Discard lockwashers.
33. Remove gasket (Figure 7, Item 6) and oil seal ring (Figure 7, Item 8) from rear cover (Figure 7, Item 7). Discard
seal ring and gasket.
34. Press crankshaft (Figure 7, Item 4) with ball bearings (Figure 7, Items 3 and 9) out of crankcase (Figure 7,
Item 5) from drive end of compressor.
35. Press ball bearings (Figure 7, Items 3 and 9) off crankshaft (Figure 7, Item 4).
Figure 7. Crankshaft.
0064
END OF TASK
CLEANING AND INSPECTION
00064
1. Clean and inspect all parts IAW General Maintenance Instructions (WP 0019).
2. Inspect cylinder head for cracks or wear and replace if necessary.
3. Use air pressure to test water jacket of cylinder head and cylinder block for leakage. Replace unit if leaking.
4. Check crankcase, cylinder block, and end covers for cracks and broken lugs. Replace lugs if damaged.
5. Inspect ball bearings for wear or flat spots. Replace bearings if worn. Check ball bearing fit in crankcase.
Bearings must be a finger-press fit. If crankcase bearing bores are worn or damaged, replace crankcase.
0064-9

