to Parts Manual for applicable part numbers.
1000 HOUR MAINTENANCE OPERATIONS
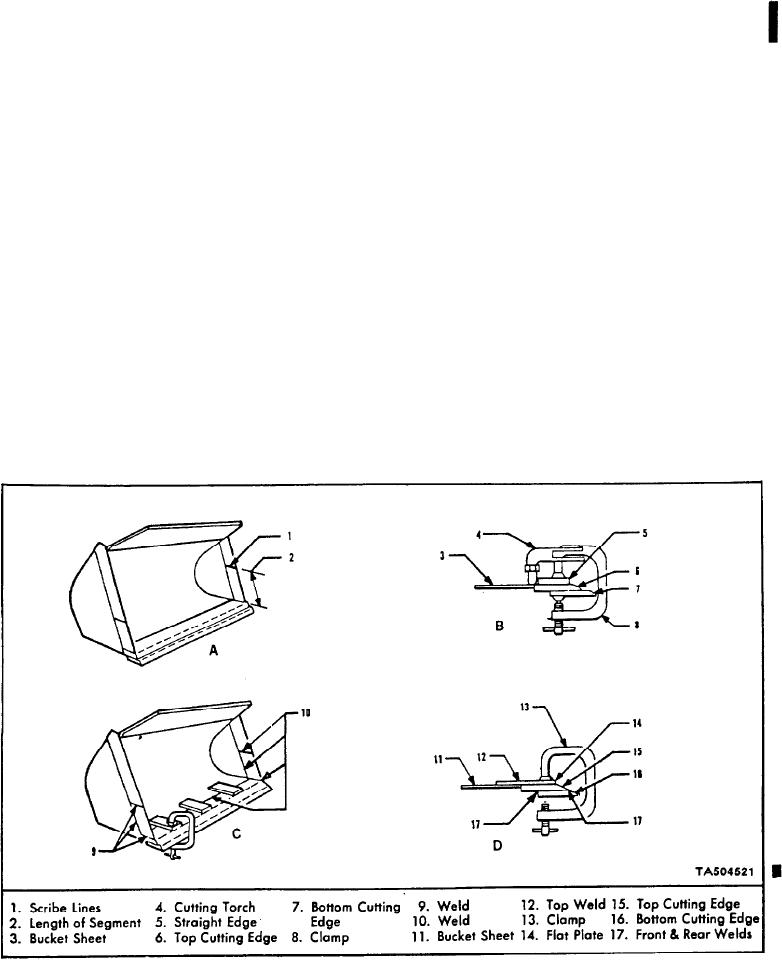
To replace bucket cutting edges, follow the pro-
ENGINE MAINTENANCE
cedure outlines in (a) and (b) below referring to
Figure 42 and Figure 42.1.
CHECK AND REPAIR BUCKET CUTTING EDGE
(a) Bottom Cutting Edge
CHECK BOOM TO BUCKET LINKAGE
1. Scarf out front and rear welds Item 17 securing
bottom cutting edge to top cutting edge as shown
INSPECT, TEST AND LUBRICATE
ELECTRICAL UNITS
in view "D". Grind rough edges smooth.
ADJUST STEERING GEAR
2. Align and clamp bottom cutting edge and tack
weld in place. See view "D".
INSPECT FRAME
3. Finish welding bottom cutting edge to top cut-
E n g i n e Maintenance: Refer to Operation and
ting edge. Front weld is a continuous 3/8 inch
M a i n t e n a n c e Manual of engine manufacturer for
fillet weld along entire edge. Rear weld is a 3/8
maintenance instructions of engine and accessor-
inch intermittent fillet weld consisting of a se-
ies.
ries of 3 inch welds equally spaced on 10 inch
centers.
Check and Repair Bucket Cutting Edge: The
b u c k e t should be periodically checked for badly
Note: Use a 3/16 diameter low hydrogen electrode
ripped, cracked, chipped or worn-out cutting edges
equivalent to AWS-E-10016.
(bottom and sides).
4. Grind front weld to present a smooth surface
for entry of material.
If at any time it becomes necessary to replace
the bucket cutting edge (bottom and or sides) re-
placement parts can be ordered separately. Refer
(b) Top, Bottom, and Side Cutting Edges
Fig. 42.
Repair Bucket Cutting Edge
[45-06-1]
Change 2

