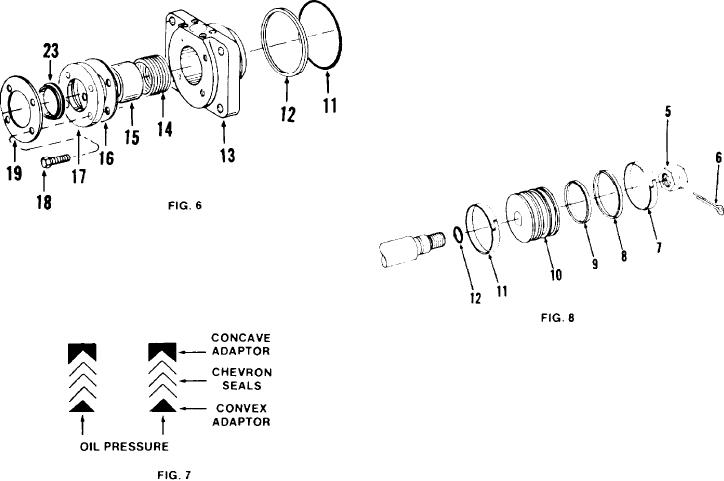
cap (17). Place the mono seal cap (17) into the
5. Press dirt wiper (23) in retainer (19) and fast-
cylinder cap (15) and secure with bolts and lock
en to cap with bolts (18). Do not tighten bolts
until the packing assembly has been installed or
washers (18 and 19).
the piston rod.
4. Place the special tool, described above, on the
piston rod and slide the packing assembly onto
6. Use a tool as shown in Figure 4 and install the
the rod.
packing assembly on piston rod. Tighten bolts
(18).
If the packing assembly is of the multiple Chev-
After the machine has been operating in the field
ron type, use the following assembly instruction:
for a time, it may be necessary to remove some of
the spacers (16) to tighten the packing and prevent
leaks.
P I S T O N AND PISTON SEALS
1. Place the back-up ring (12) and the O-ring (11)
on the cylinder cap (13). The back-up ring is
next to the O-ring opposite the side which re-
ceives oil pressure.
1. After the rod packing has been slid onto the rod,
place "O" ring (12) in the groove on the piston
rod. All pistons have this "O" ring and it must be
c h a n g e d each time the outer piston seals are
replaced.
2. Lightly coat the "O" ring (12) with grease and
carefully slide the piston (10) on the piston rod
and over "O" ring (12).
2. Place a thin coat of light grease on the Chev-
3. Install and torque nut (5). If the cylinder is re-
ron seals. Install the convex Chevron seal
built using the old piston rod it will have a cotter
adaptor first, then the Chevron seals, then the
pin or bolt hole already drilled in the end of the
c o n c a v e Chevron adapter in the cylinder cap
rod. Always torque the nut - if the hole in the
(13).
rod and in the nut are not aligned when properly
torqued, the nut may be tightened as much as 1/8
3. Install the bushing (15) on top of the Chevorn
of a turn to align the holes. Never loosen the nut
packing (14) and inside of the cylinder cap (13).
to align the holes. If necessary, drill a new hole
through both the nut and rod. Install the cotter
4 . Place spacers (16) four required, between cap
pin.
(13) and cap (17) and place cap (17) on cap (13).
[55]

