TM 5-3805-258-10
TRANSPORTATION HINTS
WARNING
A dangerous pinch point exists at the
bucket tip cylinder.
Be alert, and use
extreme caution when working in this
area.
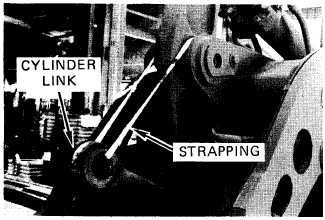
21.
Remove strap from bucket tip cylinder
link.
22.
Move bucket tip cylinder as needed to
aline with the center link pin joint.
Two
people may be needed to move the link into
position.
23.
Use the screw jack as needed for final
alinement.
Loosely install the center
coupler pin and shims.
24.
Install capscrews in coupler pins and
tighten securely.
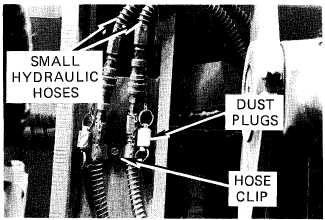
25.
Remove dust plugs from the two small
hydraulic lines from the coupler and
matching lines from the bucket arm.
73
26.
Connect
hoses.
the two small hydraulic
27.
Remove the small capscrews from the
back of the coupler and use to secure the
small hose clips.
28.
Connect the dust plugs together to
prevent dirt from entering.
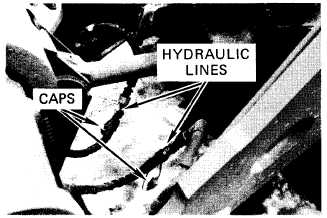
29.
Remove the dust plugs from the two
large hydraulic lines from the coupler and
the matching lines from the bucket arms.
30.
Connect the two large hydraulic
lines.
Connect the dust plugs together to
prevent dirt from entering. Clip to
bucket.
31.
Remove the screw jack. handle, and
base plate from beneath the bucket and
store in proper places on trailer frame.
Tighten mounting hardware securely.
32.
Remove the capscrews securing the
support brace to the bucket and remove
the support braces.
33.
Reinstall the capscrew and nut in
support braces.
Store support braces in
their proper position on trailer frame.
Tighten mounting hardware securely.
34.
Start machine and tip bucket up
slightly.