E L E C T R I C A L
S Y S T E M
TM 5-3805-258-24-1
T E S T I N G
A N D
A D J U S T I N G
2.
3.
4.
Cables between the battery, starter and engine
ground must be the correct size. Wires and ca-
bles must be free of corrosion and have cable
supports clamps to prevent stress on battery con-
nections (terminals).
Leads, junctions, switches and panel instru-
ments that have direct relation to the charging
circuit must give correct circuit control.
Inspect the drive components for the charging
unit to be sure they are free of grease and oil and
have the ability to operate the charging unit.
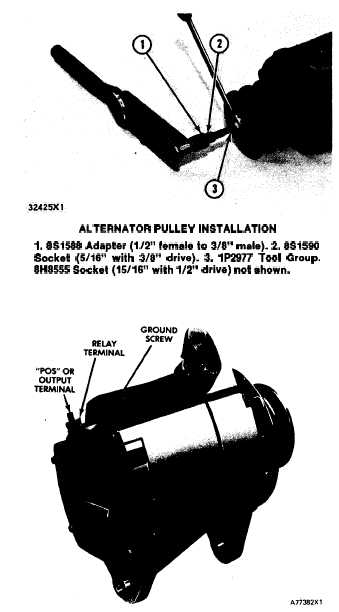
Delco-Remy Alternator; Pulley Nut Tightening
Tighten nut holding the pulley to a torque of 100
± 7 N·m (75 ± 5 lb. ft. ) with the tools shown.
ALTERNATOR PULLEY INSTALLATION
1. 8S1566 Adapter (1/2” female to 3/8” male). 2. 8S1590
Socket (5/18” with 318” drive). 3. IP29?7 Tool Group.
8H8555 Sockat (15/16” with 112” drive) not shown.
Delco-Remy 24V 50A (3T1888 Alternator)
6 N 9 2 8 4 A L T E R N A T OR
No adjustment can be made to change the rate of
charge on this alternator regulator. If rate of charge
is not correct, a replacement of the regulator is
necessary.
STARTING SYSTEM
T o o l s
N e e d e d :
5 P 3 0 0
E l e c t r i c a l
T e s t e r .
NOTE: Make reference to Special Instruction Form
No. SEHS7006 and to the instructions inside of the
cover of the tester, when testing with the 5P300
Electrical Tester.
Use a D.C. Voltmeter to find starting system com-
ponents which do not function.
Move the starting control switch to activate the
starter solenoid. Starter solenoid operation can be
heard as the pinion of the starter motor is engaged
with the ring gear on the engine flywheel. The solen-
oid operation also closes the electric circuit to the
motor. Connect one wire of the voltmeter to the
solenoid connection (terminal) that is fastened to the
motor. Connect the other wire to a good ground.
Activate the starter solenoid and look at the volt-
meter. A reading of battery voltage shows the prob-
lem is in the motor. The motor must be removed for
more testing. No reading on the voltmeter shows that
the solenoid contacts do not close. This is an indica-
tion of the need for repair to the solenoid or of an
adjustment to be made to starter pinion clearance.
If the solenoid for the starter motor will not oper-
ate, current from the battery may not be getting to
the solenoid. Fasten one wire of the voltmeter to the
connection (terminal) for the battery cable on the
solenoid. Connect the other wire to a good ground.
No voltmeter reading shows there is a break in the
circuit from the battery. More testing is necessary
when there is a reading on the voltmeter
Now make a test by fastening one voltmeter wire
to the connector (terminal) for the small wire at the
solenoid and the other wire to a ground. Look at the
voltmeter and activate the starter solenoid. A volt-
meter reading shows that the problem is in the solen-
oid. No voltmeter reading shows that the problem is
in the starter switch or wiring. Fasten one wire of the
voltmeter to the battery wire connection of the
starter switch and the other wire to a ground. A
voltmeter reading shows a failure in the switch.
A starter motor that operates too slowly can have
an overload because of too much friction in the en-
gine being started. Slow operation of the starter mo-
tor can also be caused by shorts, loose connections
and/or dirt in the motor.
4-41


