TM 5-3805-262-20
TESTING (SHEET 2 OF 2)
(c) Start engine and run at 2000 rpm.
Perform steps (d) through (f) below as quickly as possible. Don’t load
battery for more than 15 seconds at a time. Wait 1 minute before repeat-
i n g t e s t t o a l l o w t e s t e r t o c o o l .
(d)
( e)
( f )
(g)
( h)
Adjust tester LOAD control for maximum tester ammeter indication.
Record indication on tester ammeter.
Turn tester LOAD control to OFF position.
Shut down loader engine.
If tester ammeter indication recorded in step (e) above is 55 to 65
amperes, alternator is okay. Proceed to step (1) below.
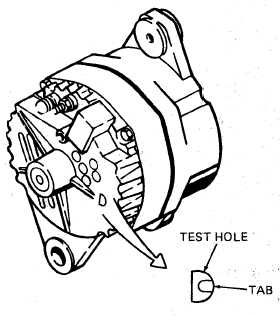
In following step do not force end of screwdriver deeper than one inch
i n t o alternator. Tab is within 3/4 inch of housing surface at test hole.
( i )
( j )
( k)
( l )
(m)
( n)
If ammeter indication is less than
55 amperes, insert end of screw-
d r i v e r i n t e s t h o l e a t a l t e r n a t or
rear housing as shown. Hold screw-
driver in contact with tab and al-
ternator housing and repeat steps
(c) through (g) above.
Remove screwdriver from alternator
t e s t h o l e.
If tester ammeter indication is now
55 to 65 amperes, alternator voltage
r e g u l a t o r i s d e f e c t i v e . I f t e s t e r
a m m e t e r i n d i c a t i o n i s s t i l l l e ss
than 55 amperes, alternator is de-
f e c t i v e . R e p l a c e a l t e r n a t o r ( p a ge
5-10). Tag defective alternator and
forward to direct support mainte-
n a n c e f o r r e p a i r .
Disconnect starting and charging
system tester leads.
Install engine left rear side panel (page 9-17).
C l o s e r a d i a t o r g r i l l e .
5-9


