TM 5-3805-258-24-1
9 5 0 B O P E R A T O R ’ S S T A T I ON
E L E C T R I C A L T R O U B L E S H O O T I N G
B. With the system latched up, move a magnet close to the OFF position
(position B) of the switch. If the switch unlatches, install a new magnet
on the machine.
C. If the magnet did not make the circuit unlatch, disconnect the switch
harness from the machine harness. With the main power switch turned
ON, check for power on Socket 1 in the plug of the machine harness. If
Socket 1 does not have power, check the R/O wire back to the solenoid
and find where the power is lost. If Socket 1 has power, connect the
machine harness to the switch and go on to Step D.
D. With the system latched up (main power switch turned ON), disconnect
the 9G116 Bucket Positioner Switch harness. If the solenoid is de-
activated, make a replacement of the 9G116 Switch Assembly. If the
solenoid does not de-activate, go on to Step E.
E. Disconnect the P/B wire from the bucket positioner solenoid. If the
solenoid de-activates, check for a short to ground in the P/B wire
between the switch and the solenoid. If it does not de-activate, make a
replacement of the solenoid.
IF THE BUCKET POSITIONER KICKS OUT BUT WILL NOT
LATCH UP, make a replacement of the 9G116 Switch Assembly.
Bench Test of the 9G116 Bucket Positioner Switch Assembly
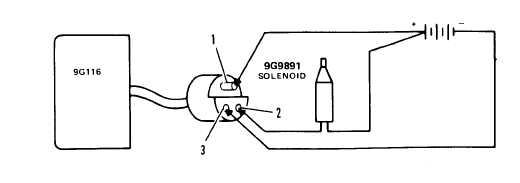
Connect the switch as in the following schematic. Move a 4V4840 Magnet
from position A to position B at a distance of 6.4 to 10.0 mm (.25 to .39 in.) from
the switch box. There must be no effect when the magnet is close to the OFF po-
sition (position B). When the magnet is close to the ON position (position C)
the solenoid must be activated and must keep activated as the magnet goes on to
position D. Now move the magnet from point D to point A. There must be no ef-
fect when the magnet is close to the ON (C) position. When the magnet is close
to the OFF (B) position, the solenoid must de-activate.
Bench Test of Bucket Positioner Switch
4-135


