TM 5-3805-258-24-2
ENGINE
DISASSEMBLY AND ASSEMBLY
CRANKSHAFT PULLEY
REMOVE CRANKSHAFT PULLEY
1205-11
Tools Needed
A
8B7559
Adapter
2
8B7561
Step Plate
1
8B7550
Leg
2
8H684
Ratchet Box Wrench
1
8B7548
Puller Assembly
1
1.
2.
3.
start by:
a) remove radiator and guard
b) remove fan
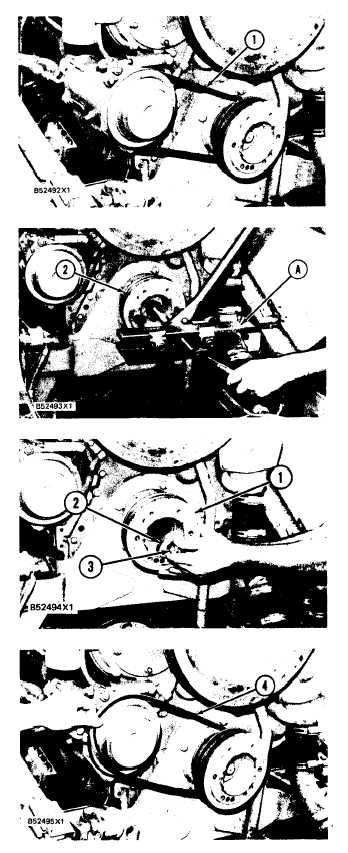
Loosen the nuts and bolts from the air condi-
tioner compressor and remove vee belt (1) (if so
equipped).
Loosen the bolt in the end of crankshaft pulley
(2) until there is approximately 9.5 mm (3/8”)
between the retainer and crankshaft pulley. In-
stall tooling (A) and loosen crankshaft pulley
(2) from the crankshaft.
Remove tooling (A), the bolt, washer and
crankshaft pulley (2) from the crankshaft.
INSTALL CRANKSHAFT PULLEY
1205-12
Tools Needed
A
Borroughs Tool Company Part No.
BT-33-95
1
1.
2.
3.
4.
5.
6.
Put crankshaft pulley (1) in position on the
crankshaft.
Install washer (2) so the maximum flat area is
next to the crankshaft pulley and bolt (3) as
shown.
Install two ½”-l3 NC bolts 2 in. long in the
pulley. Put a pry bar between the bolts and
against the frame so the crankshaft will not
turn while bolt (2) is tightened to the correct
torque.
Tighten bolt (2) to a torque of 312 ± 27 N·m
(230 ± 20 lb. ft.). Hit the bolt with a hammer.
Tighten the bolt again to a torque of 312 ± 27
N·m (231 ± 20 lb.ft.).
Install vee belt (4) on the air conditioner
compressor and the crankshaft pulley (if so
equipped).
Use tool (A) to measure the belt tension. Ad-
just the belt tension until the gauge reading for
a new belt is 534 ± 22 N (120 ± 5 lb.). Adjust
the belt tension until the gauge reading for a
used belt is 400 ± 44 N (90 ± 10 lb.). A used
belt is one which has more than 30 minutes of
operation at rated engine speed. When the belt
tension is correct, tighten all the bolts and nuts
in the mounting bracket.
5-58


