ENGINE
TM 5-3805-258-24-2
DISASSEMBLY AND ASSEMBLY
CRANKSHAFT FRONT SEAL AND WEAR SLEEVE
REMOVE CRANKSHAFT FRONT SEAL
AND WEAR SLEEVE
1160-11
Tools Needed
A
B
C
1P3075
Puller Assembly
1
5P7312
Distorter
1
5P7315 Ring
1
start by:
a) remove crankshaft pulley
NOTE: When a replacement of the front seal is
made, a replacement of the wear sleeve is to be made
also.
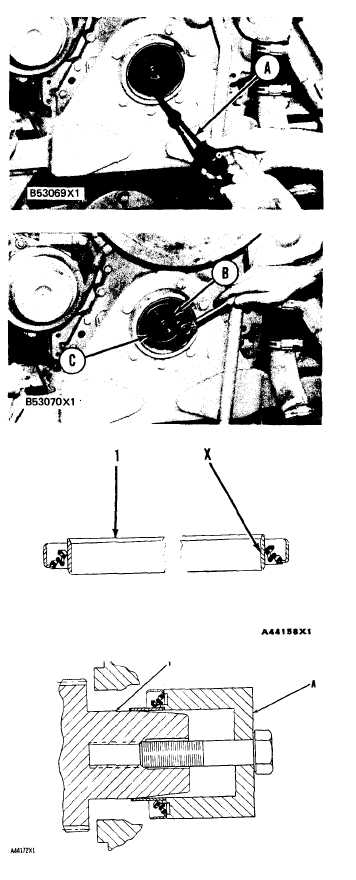
1. Remove the crankshaft front seal with tooling
(A).
2. Install tool (C) into the seal bore.
3. Install tool (B) between tool (C) and the wear
sleeve. Turn tool (B) until the edge of the tool
makes a flat place (crease) in the wear sleeve.
Do this in two or more places until the wear
sleeve is loose.
4. Remove tool (C) and the wear sleeve by hand.
INSTALL CRANKSHAFT FRONT SEAL
AND WEAR SLEEVE
1160-12
Tools Needed
A
5P7299
Installer
1
7F8022
Bolt
1
NOTE: The wear sleeve and seal must be installed
together.
1.
2.
3.
4.
5.
6.
Put clean engine oil on the seal lip and on the
outside diameter of wear sleeve (1). Install the
seal on the wear sleeve as shown with the lip of
the seal toward the side of the wear sleeve that
has the chamfer on the inside diameter.
Use 6V1541 Quick Cure Primer to remove any
oil from inside diameter “X” of the wear sleeve
and surface “Y” of the crankshaft. Make an
application of 9S3265 Retaining Compound to
surfaces “X” and “Y”.
Put the wear sleeve and seal on to the crank-
shaft as shown with the lip of the seal toward
the engine.
Install tooling (A) as shown and put lubricant
between the bolt head and installer.
Use tooling (A) to push the wear sleeve and seal
on to the crankshaft until the installer is against
the end of the crankshaft. The wear sleeve and
seal will then be in the correct location.
Remove tooling (A).
end by:
a) install crankshaft pulley
5-59