TM 5-3805-262-34
DISASSEMBLY (SHEET 2 OF 3)
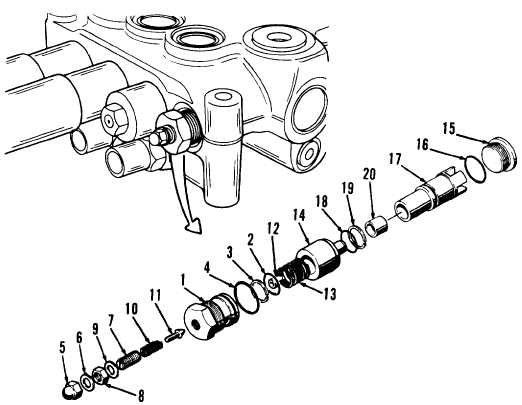
(5) Put valve cap (1) in a vise with acorn nut (5) upwards.
(6) Remove acorn nut (5).
(7) Remove washer
(8) Hold setscrew
( 6 ) .
(7) stationary using screwdriver and loosen nut (8).
NOTE
When performing following step, record number of turns required to
remove setscrew (7) to aid reassembly.
(9) Remove setscrew (7) with nut (8) and washer (9). Record number of turns
required to remove setscrew. Do not remove nut from setscrew unless re-
placement is required.
(10) Remove spring (10) and relief plunger (11) from valve cap (1).
(11) Remove plunger seat (12), spring (13), and poppet (14) from control valve
body.
(12) Remove plug (15) from control valve body. Remove and discard O-ring (16).
LEGEND
1. Valve cap
2. O-ring
3. Backup ring
4. O-ring
5. Acorn nut
6. Washer
7. Setscrew
8. Nut
9. Washer
10. Spring
11. Relief plunger
12. Plunger seat
13. Spring
14. Poppet
15. Plug
16. O-ring
17. Valve seat
18. O-ring
19. Backup ring
20. Valve sleeve
3-689


