TM 5-3805-258-24-2
POWER TRAIN
DISASSEMBLY AND ASSEMBLY
b)
c)
d)
FRONT AND REAR DIFFERENTIALS
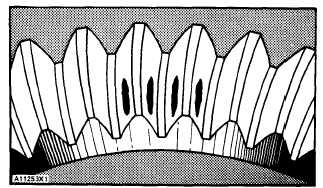
With no load, correct tooth contact setting
will be as shown. The area of contact starts
near the toe of the gear and goes 3090 to 50
% up the length of the tooth. With this
setting, when a load is put on the gear, the
load will be over the correct area of the
teeth.
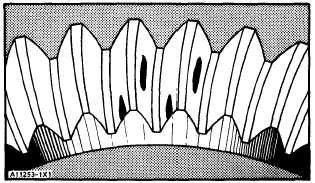
[f bevel pinion shaft is too far away from
bevel gear, short toe contact will be the
result as shown. The teeth of pinion will be
in contact with toe ends of convex faces
(part that makes a curve toward the out-
side), and top edge of heel end of concave
faces (part that makes a curve toward the
inside). To correct this, remove shims from
between pinion cage and carrier. After this
is done, check gear clearance (backlash)
and tooth contact again.
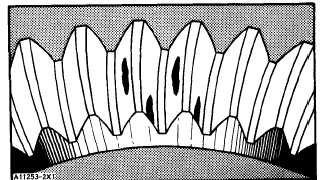
If bevel pinion shaft is too near to center of
bevel gear, short heel contact will be the
result as shown. The teeth of pinion will be
in contact with toe ends of concave faces
(part that makes a curve toward the inside)
and the heel ends of convex faces (part that
makes a curve toward the outside). To cor-
rect this, add shims between pinion cage
and carrier. After this is done, check gear
clearance (backlash) and tooth contact
again.
NOTE: Several adjustments of both pinion and bevel
gear can be needed before correct tooth contact and
gear clearance (backlash) is made. Always re-
member that a change to gear clearance (backlash)
will also change the tooth contact. Therefore, be sure
gear clearance (backlash) is in correct adjustment
before tooth contact is checked.
e)
f)
After correct gear clearance (backlash)
and tooth contact is correct, remove extra
Prussian blue, red lead or paint from bevel
gear and pinion.
Install the O-ring seal between the pinion
28.
housing and carrier assembly. Remove the
guide bolts and install the remainder of the
bolts that hold the pinion housing in place.
Tighten the bolts to a torque of 270 ± 25
N-m (200 ± 20 lb. ft.).
Install locks (31), the bolts and lockwire for
each adjustment nut. Remove the differential
and carrier assembly from tooling (A).
end by:
a) install front or rear differential
CORRECT TOOTH
CONTACT SETTING
SHORT TOE
CONTACT SETTING
SHORT HEEL
CONTACT SETTING
5-208


