TM 5-3805-262-20
INSTALLATION (SHEET 1 OF 2)
When using chain hoist to remove or install parts, be sure chain hoist
i s s e c u r e l y f a s t e n e d t o p a r t a n d t h a t a l l s l a c k i n c h a i n i s t a k e n u p .
Failure to do so could cause serious injury due to part falling on you.
If you are injured by falling equipment, obtain medical aid immediately.
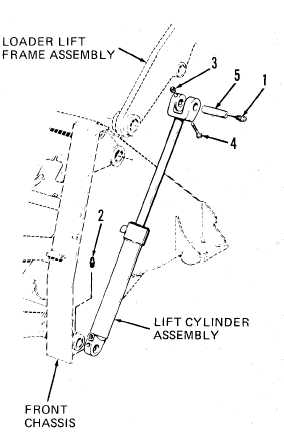
(1) Attach chain hoist equipped with nylon straps to lift cylinder assembly
(8). Carefully raise lift cylinder assembly and install its bottom end on
shaft .
(2) Aline hole in lift cylinder assembly tube eye with hole in pivot shaft .
(3) Apply Loctite 242 (blue) to threads of capscrew (7) and lock nut (6).
(4)
Install and tighten capscrew (7) and locknut (6) to 1000 to 1200 lb-ft .
(5) Connect two hoses to elbows installed in lift cylinder assembly ports
(step (11), page 11-57). Tighten fittings securely .
Don’t use your
l o s e a f i n g e r
obtain medical
(6)
(7)
( 8)
(9)
(10)
(11)
(12)
finger to check alinement in
o r s u f f e r s e v e r e i n j u r y
aid immediately.
Start engine and operate at idle
speed. Place LIFT ARM control lever
in RAISE position until rod end eye
of cylinder is alined with hole in
loader lift frame assembly.
Start pin (5) in cylinder rod eye
and lift frame assembly. Be sure
hole in pin is alined with hole in
rod end.
Using hammer and 1-7/8 inches
diameter rod, drive pin (5) into rod
eye and lift frame assembly.
Apply Loctite 242 (blue) to threads
of capscrew (4) and lock nut (3).
Install and tighten capscrew (4) and
locknut (3) to 1000 to 1200 lb-ft .
Remove chain hoist nylon straps from
l i f t c y l i n d e r a s s e m b l y .
t o
f o l l o w i n g s t e p . Y o u c o u ld
d o s o . I f y o u a r e i n j u r e d,
I n s t a l l l u b r i c a t i o n f i t t i n g s ( 2 a n d 1 ).
11-69