TM 5-3805-262-20
12-1. SIGNALING DEVICES MAINTENANCE (CONT)
e. Turn Signal Lamp Assemblies (cont).
INSTALLATION
(1)
(2)
(3)
( 4 )
(5)
(6)
Inspect lamp assembly (8) wire for cracked
or broken insulation or broken wire strands
at connection to terminal (2). Repair crack-
ed or broken insulation by applying insula-
tion tape to area. If broken wire strands
are seen, cut wire as close to terminal as
possible. Strip 1/4 inch insulation from end
of wire taking care not to cut through wire
then crimp new terminal securely onto wire.
Inspect wiring harness terminal (1) wire for
cracked or broken insulation or broken wire
strands at connection to terminal. Repair
cracked or broken insulation by applying in-
s u l a t i o n t a p e t o a r e a.
If broken wire strands
are seen, cut wire as close to terminal as
possible. Strip 1/4 inch insulation from end
of wire taking care not to cut through wire
then crimp new terminal securely onto wire.
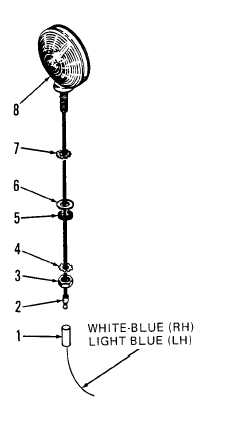
Install lock washer (7), washer (6), and
rubber washer (5) on lamp assembly (8)
mounting stud.
position lamp assembly (8) mounting stud
with installed parts in mounting hole at
top of cab.
From inside cab,
install and tighten lock washer (4) and nut (3).
Connect terminals (1 and 2) by grasping both with your fingers, alining,
and firmly pushing them together.
NOTE
Repeat steps (1) through (6) above to install remaining lamp assembly
( 8 ).
(7) Start engine and operate at idle speed. Move turn signal switch lever to
up position and check that left lamp assembly blinks on and off. Move
lever to down position and check that right lamp assembly blinks on and
off. Move lever to center position and turn off engine. If lamps do not
operate, refer to troubleshooting (page 3-198).
(8) Glue cab foam to cab ceiling using small amount of adhesive applied to
back of foam.
12-18


