TM 5-3805-262-20
12-3. LOADER BUCKET ASSEMBLY MAINTENANCE (CONT)
a. Loader Bucket Assembly (cont).
REMOVAL (SHEET 3 OF 3)
Before performing following step,
c h e c k a n d m a k e s u r e t h a t p l u g s a re
i n s t a l l e d a n d t i g h t e n e d i n t w o h o s e s d i s c o n n e c t e d f r o m l o a d e r b u c k et
assembly lines. Failure to do so may cause hydraulic oil to flow from
disconnected lines.
(7) Start engine and operate at idle speed. Raise lift arms just enough to
clear bucket assembly, then move loader slowly back until loader is clear
of bucket assembly. Turn off engine.
(8) Attach chain hoist to loader bucket assembly and move to repair area.
INSTALLATION (SHEET 1 OF 2)
(1)
Attach chain hoist to replacement loader bucket assembly and move into
p o s i t i o n i n f r o n t o f l o a d e r.
(2)
Start loader engine .
(3) Slowly move loader into position while assistant guides you. Be sure that
lift arms are raised just enough to clear bucket assembly.
Tell personnel not to use their fingers to
check alinement in following step. To do
s o c o u l d c a u s e l o s s o f f i n g e r o r s e r i o us
i n j u r y .
I f p e r s o n n e l a r e i n j u r e d , o b t a i n
medical assistance immediately.
( 4)
Lower lift arms until holes in lift
arm are alined with associated holes
in bucket assembly. Turn off loader
engine.
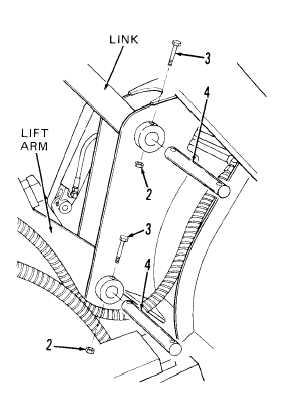
(5) Swing links down and aline holes in
link with top mounting holes in load-
er bucket assembly.
(6)
Secure link to bucket assembly by in-
stalling pivot pin (4) using hammer
and 1-7/8 inches diameter rod. Be sure
that hole in pivot pin is aligned with
associated hole in bucket mounting
b o s s .
12-22