TM 5-3805-258-24-1
F U E L S Y S T E M
T E S T I N G
A N D
A D J U S T I N G
NOTE: When reference is made to crankshaft rota-
tion, the engine is seen from the flywheel end.
1. Put No. 1 piston at top center (TC) on the
compression stroke. Make reference to FIND-
ING TOP CENTER COMPRESSION POSI-
TION FOR NO. 1 PISTON.
2. Remove the timing bolt from the flywheel.
3. Remove No. 1 Fuel injection line and nozzle.
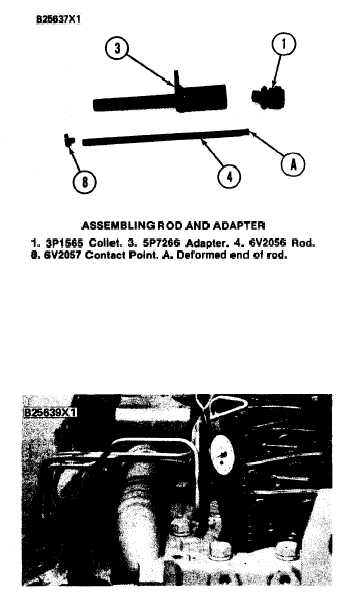
ASSEMBLING ROD AND ADAPTER
1. 3P1565 Collet. 3. 5P7266 Adapter. 4. 6V2056 Rod.
6. 6V2057 Contact Point. A. Deformed end of rod.
4. Put a small amount of clean oil on 6V2056
Rod (4) and put the rod in 5P7266 Adapter
(3). End (A) of the rod must be inside the
adapter. End (A) has been deformed and will
not let the rod fall through the adapter into
the cylinder. Install 6V2057 Contact Point (8)
on the end of rod (4).
5.
D I A L
I N D I C A T O R
I N S T A L L ED
( T Y P I C A L
E X A M P L E )
Put adapter (3) in the same hole that No. 1
fuel nozzle was removed from. Fasten adapter
(3) to head with bolt and spacer from fuel
nozzle.
6.
7.
8.
Do
Install 3P1565 Collet (1) in the top of adap-
ter (3).
Install the 9S8883 Contact Point on 9S215
Dial Indicator (2) and put indicator (2) in
adapter (3) thru collet (1).
Position the dial indicator (up or down) so
small pointer is on “0” (zero) and tighten collet
(1).
CAUTION
not tighten collet too much or damage to
the dial indicator can result.
9. Loosen the screw that locks the dial face. Move
the dial face until the large pointer is on “0”
(zero) and tighten the lock screw.
10. Turn the crankshaft a minimum of 45 degrees
in a clockwise direction. Slowly turn the crank-
shaft in a counterclockwise direction until a
maximum reading is seen on the dial indicator.
Adjust the indicator up or down in the collet
until the revolution counter is at +.300 in.
(Black Numbers). Tighten the collet to hold
the indicator in this position. Loosen the bezel
lock and turn the bezel until the zero on the
face of the dial is in alignment with the hand.
Tighten the bezel lock.
11. Slowly turn the crankshaft in a counterclock-
wise direction until the dial indicator moves
beyond .020 in. Now turn the crankshaft in
the opposite direction until the dial indicator
is at .020 in.
12. Make a pointer from a piece of wire and install
under bolt of water pump. Make a temporary
mark on the vibration damper in relation to
the pointer.
CAUTION
Do not use a hammer and punch to mark a
vibration damper.
13.
14.
Turn the crankshaft in a clockwise direction
beyond the maximum indicator reading and
bevond .020 in. Now turn the crankshaft in a
counterclockwise direction until the dial in-
dicator is .020 in.
Make a second temporary mark on the vibra-
tion damper in relation tO the pointer. Now
make a mark on the vibration damper that is
one-half the distance between the two tem-
porary marks. This mark is the point of most
accuracy for top center No. 1 piston.
4-14.2


